The testnet is extremely useful for assisting in the development of Bitcoin software. You can grab some test coins from this faucet and avoid spending the time and money trading for actual Bitcoins to get started building and testing software. Getting a test environment up and running smoothly in Windows might not be immediately obvious so we will discuss the particularities of Windows 7 and fix a minor annoyance here.
Setup and Blockchain Download
Grab the latest Bitcoin Core wallet from bitcoin.org. Install it but do not run just yet, we have some setup to do first.
Browse to C:\Program Files\Bitcoin, or to the directory of your Bitcoin Core installation if it is different. Right click and select "Create Shortcut". Windows should offer to make a desktop shortcut, feel free to put it there or into your own start menu items. Rename your shortcut to "Bitcoin Testnet".
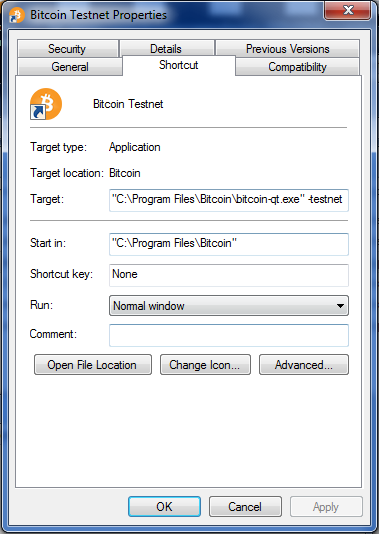
Right click the shortcut and select "Properties". In the "Target" field, add "-testnet" after the end of the command path separated from the path by a space:

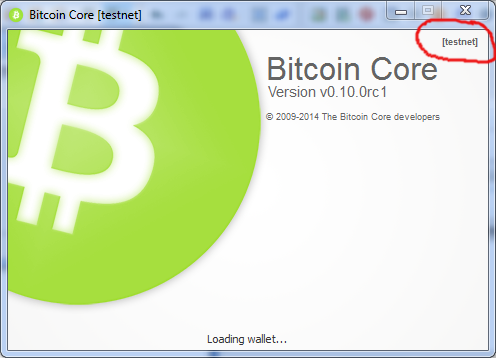
Now we're ready, launch it! You should see a green Bitcoin logo and [testnet] on the splash window:

Loading the blockchain will take a long time. While you're waiting here's a few things to keep you busy:
- While loading the chain Bitcoin Core can still generate addresses. Send yourself some coin from the faucet. By the time the chain has loaded you'll have some coin waiting.
- If you plan on following the pop up window fix later in this post, or if you want to build Bitcoin yourself for experimentation or contribution to the Open Source community, follow the instructions here for building Bitcoin with QT5 using MinGW. This one will take a while probably. See you when you get back.
- Learn about the Bitcoin RPC commands (Help menu -> Debug window -> Console tab. "help" and "help [command]")
-
Make a bitcoin.conf file in %AppData%\Roaming\Bitcoin\bitcoin.conf . This can contain everything from the configuration options listing. You will want at minimum:
server=1
rpcuser=[username]
rpcpassword=[password]
rpcconnect=127.0.0.1
Additionally, you may want to use walletnotify, blocknotify, and alertnotify to build software that receives events from Bitcoin, as opposed to polling for new data.
Running a Second Instance
It's really handy to run two wallets while developing Bitcoin software. Your software probably has to deal with both sending and receiving. If what you are sending and receivng to is local, you can just keep recycling the same coins over and over for testing. The transaction fee on testnet is very small (on the order of a few hundred Satoshis) so a small amount of testnet coin can last through a lot of tests.
Before we start here, the blockchain for your first Bitcoin Core testnet is up to date right? You really don't want to follow the next few instructions until you have the fully updated blockchain, else you'll be downloading 2 copies of it at once, slowing it down even more than it already is.
Good, so now that we have the entire chain, let's dupe it. Find your %AppData%\Roaming\Bitcoin directory. We are going to copy this directory entirely. I just selected the Bitcoin directory, pressed "Ctrl-C" and then "Ctrl-V" and Windows made me a copy really fast. I named this directory "BitcoinTestnet". Note that if you are doing this on top of an existing Bitcoin installation and don't want to duplicate the entire main chain also, all we need here is the content of the "testnet3" directory and a copy of "bitcoin.conf" which we will edit in a moment.
Browse into your new %AppData%\Roaming\BitcoinTestnet\testnet3 directory. There will be a wallet.dat file in here, the address and wallet data from the first testnet client. We don't want it, this instance will need it's own wallet. Just trash this file and a new one will get generated for you when we launch.
Now there is two things we need to consider here about our second instance.
- We need to somehow tell Bitcoin about this new BitcoinTestnet data directory that we made.
- Any network ports that Bitcoin opens up must not conflict with the first instance listening on those ports.
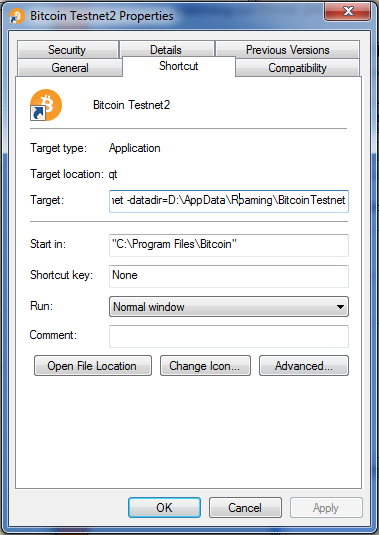
Solving item 1 is very simple. We can just add a -datadir when we launch. Duplicate the desktop shortcut we made in the first part of this article. I cleverly named this shortcut "Bitcoin Testnet2" Right click and edit the properties:

My "Target" now looks like this:
"C:\Program Files\Bitcoin\bitcoin-qt.exe" -testnet -datadir=D:\AppData\Roaming\BitcoinTestnet
Of course, we can't use bitcoin.conf to specify the -datadir path because it would have no way to find bitcoin.conf without that directory. There are however things we can change in bitcoin.conf to help solve issue 2 in the list above.
There are 2 different ports we need to concern ourselves with. The RPC port and the peer to peer network port. In my setup, I have elected to run the RPC server on both instances (server=1), but the RPC port conflict might be solved by just setting server=0 on this second Bitcoin instance. Otherwise, use the "rpcport" option. The "port" option changes the main peer to peer network port. My %AppData%\Roaming\BitcoinTestnet\bitcoin.conf file now looks like this:
server=1
port=11111
rpcuser=[user]
rpcpassword=[pw]
rpcconnect=127.0.0.1
rpcport=11112
Now you should be able to launch the second desktop shortcut without issues. Congratulations, you are now running 2 Bitcoin testnet clients. Send yourself some coins and watch it notify you twice in celebration.
Program Notifications: Attack of The Annoying Popup
The software I'm working on currently waits for something to happen from Bitcoin and then springs into action. It utilizes the blocknotify, walletnotify, and alertnotify features of Bitcoin core to tell my software that something happened. Specifically, it opens up Python and runs a script.
blocknotify=C:\Python27\pythonw.exe D:\myproject\notify.py block "%s"
walletnotify=C:\Python27\pythonw.exe D:\myproject\notify.py wallet "%s"
alertnotify=C:\Python27\pythonw.exe D:\myproject\notify.py alert "%s"
In theory, the "pythonw.exe" executable is not supposed to launch any command terminal window. However, the way Bitcoin launches these programs, a terminal window pops up. Because of blocknotify this means it pops up a window every 10 minutes. It steals the focus of whatever application is currently in front. Very irritating when typing code. Forget about playing video games while that is running! If Bitcoin is shut down a while and started up again later, this popup will open for each block and wallet notification that happened in the meantime, resulting in a deluge of console windows while the chain catches up.
Here is a pull request currently open on Github to fix this issue, patch attached.
If you just want to copy and paste here is a replacement runCommand() function from src/util.cpp:
void runCommand(std::string strCommand)
{
    int nErr = 0;
#ifdef WIN32
    // If we're in Windows, try using CreateProcess first.
    ULONG nExitCode;
    STARTUPINFO info={sizeof(info)};
    ZeroMemory(&info, sizeof(STARTUPINFO));
    info.cb = sizeof(STARTUPINFO);
    info.dwFlags = STARTF_USESHOWWINDOW;
    info.wShowWindow = SW_HIDE;
    PROCESS_INFORMATION processInfo;
    ZeroMemory(&processInfo, sizeof(PROCESS_INFORMATION));
    if (CreateProcess(NULL, &strCommand[0], NULL, NULL, false, 0, NULL, NULL, &info, &processInfo))
    {
        // CreateProcess succeeded so wait, check exit code and clean up.
        WaitForSingleObject(processInfo.hProcess, INFINITE);
        if(!GetExitCodeProcess(processInfo.hProcess, &nExitCode))
          nExitCode = 1;
        CloseHandle(processInfo.hThread);
        CloseHandle(processInfo.hProcess);
        nErr = (int)nExitCode; // Had to pass a ULONG to GetExitCodeProcess().
    }
    else
    {
        // If CreateProcess failed, fall back to ::system() which handles
        // corner cases such as .bat files and document opening.
        nErr = ::system(strCommand.c_str());
    }
#else
    nErr = ::system(strCommand.c_str());
#endif
    if (nErr)
        LogPrintf("runCommand error: system(%s) returned %d\n", strCommand, nErr);
}
After you've finished building your revised Bitcoin QT, replace the paths in your desktop shortcuts to point to your custom built Bitcoin QT exe.
Conclusion
Well, by now hopefully you are fully equipped to develop Bitcoin based apps on Windows. Go forth and code!